1. Attach your requirements
Choose your industry and assessment type on Evaluations. Upload up to three PDF or Excel (.xlsx or .xls) documents, up to 5 MB each. Available for every industry and sector.
Turn roadway photos and sampled video frames into asset findings, supporting evidence and clear maintenance reports.
Illustrative image and finding; not a live assessment or compliance result.
TruInspector can review video recorded at speeds up to 60 MPH, within posted limits, using a securely mounted camera.
Detection depends on visibility, camera quality and frame sampling. Small defects and hardware may need slower passes or close-up photos; this is not a validated detection-speed guarantee.
Start a roadway evaluationUpload customer directions, guidelines, standards or contract requirements as PDF or Excel files. TruInspector Ai uses the relevant requirements alongside your photos and recorded videos to support a focused assessment.
Choose your industry and assessment type on Evaluations. Upload up to three PDF or Excel (.xlsx or .xls) documents, up to 5 MB each. Available for every industry and sector.
Identify the site, location and relevant area. Add photos or recorded video, select the assessment type, and attach your requirements for any specific priorities.
Relevant findings identify the customer document and available page, section or worksheet reference, explain the visible concern, and list corrective actions and missing field checks. Download the report as PDF or Excel.
Customer requirements are identified separately from official regulations. Confirm the applicable edition and scope; an upload does not establish legal applicability or certify compliance. Attachments stay within your signed-in workspace and are not included in public picture links.
Excel review uses up to the first 1,000 rows per worksheet and may summarize the content; embedded pictures and charts are not read. Export important diagrams and longer requirements sections as PDF. Use clear, unlocked documents and check source references in the report. Unreadable content, missing measurements, concealed conditions and requirements outside the evidence remain unverified. This is an assisted visual review, not a complete contract audit.
Each example includes a detailed preliminary observation, inspector checks, recommended work and closeout record. Use the arrow to hide or show the details.
The sample image suggests a connected pattern of cracking within the travel surface, with some broken edges and loose aggregate. The visible pattern can identify an area for review but does not show crack width, depth, movement, subsurface condition or the full affected area. A single image cannot establish the maintenance rating for an entire segment.
Mark and photograph the affected limits under the required traffic control. Have the pavement team determine whether sealing, localized patching or a more extensive repair fits the verified condition. Address drainage or failed material where field evidence supports it. Record the chosen treatment, quantities and responsible reviewer before scheduling work.
Photograph the repaired surface from matching viewpoints, record dimensions and materials, and have the responsible team verify the finished ride and surface continuity.
Applicable requirement: Field review required to confirm pavement condition and repair needs. An illustrative image does not establish a field measurement or compliance result.
The example shows an uneven shoulder edge and apparent loss of surfacing. The image establishes a visible condition for follow-up but not its depth, continuous length, load-bearing capacity or relationship to the adjacent travel lane.
Set safe work limits, remove unstable material where needed and restore the shoulder surface to the field-approved profile. Investigate water flow or edge support if the damage appears recurring. Select materials and treatment from the applicable project or maintenance requirements, then record the repair limits and any traffic-control needs.
Verify the finished transition and drainage in the field; photograph the full repair and document measurements and completion date.
Applicable requirement: Flexible or rigid shoulder/turnout criteria. An illustrative image does not establish a field measurement or compliance result.
The illustration suggests erosion and a low or irregular unpaved shoulder beside the pavement. Perspective alone cannot establish the drop-off height, slope, crossfall, material depth or distance along the road.
Protect the work area, shape the shoulder to the approved profile and replace unsuitable material where necessary. Compact and stabilize the repaired section using the controlling specification. Correct a verified drainage source so the same washout does not recur, and document the limits and materials used.
Recheck the profile and drainage, then record before-and-after photos and the field measurements.
Applicable requirement: Unpaved Shoulder. An illustrative image does not establish a field measurement or compliance result.
Part of a lane line appears worn or interrupted in the demonstration image. Lighting, camera exposure and the viewing angle affect appearance, so the image does not establish measured retroreflectivity, nighttime function or the total missing length.
Verify the approved layout and remove conflicting remnants if required. Restore the correct color, width, pattern and material under the applicable traffic-control and material specifications. Sequence the work to keep the lane safely controlled, and avoid changing the layout based on the image alone.
Capture daytime and appropriate nighttime views, check the installed pattern and record quantities and material information.
Applicable requirement: Striping; confirm nighttime function. An illustrative image does not establish a field measurement or compliance result.
A pavement symbol appears partly faded in the example. The visible gap may reduce legibility, but a still image cannot establish the approved lane-use designation, required dimensions or nighttime performance.
Confirm the intended movement before repainting. Prepare the surface, remove incompatible old markings if needed and restore the approved shape and orientation with the specified material. Coordinate any lane closure and keep a record of the approved layout used for the repair.
Photograph the complete symbol from the approach, document measurements and verify that it agrees with the current plan.
Applicable requirement: Pavement Symbols. An illustrative image does not establish a field measurement or compliance result.
A sequence of raised pavement markers appears interrupted, with possible adhesive remnants in the illustrative view. The picture cannot establish the required layout, total missing count, spacing or nighttime visibility.
Confirm the layout and replace missing or failed markers with the approved type and adhesive. Remove failed remnants as required, prepare the surface and align the replacements with the existing pattern. Prioritize the work based on the verified location and traffic function.
Record the installed count and locations, then photograph the completed run and verify alignment and nighttime response if applicable.
Applicable requirement: Raised Pavement Markers; night check as needed. An illustrative image does not establish a field measurement or compliance result.

 Fence / gatesBent or damaged fence posts and gaps between gates.Read picture report
 The example depicts bent fence posts and a possible gap at a gate. The view identifies an apparent opening but cannot establish its measured width, whether the gate latches or the full extent of damaged fabric and posts.
Secure an opening that presents a verified access concern while the repair is planned. Replace or straighten damaged components as appropriate, restore tension and attachment of fabric, and adjust the gate so it closes and latches under normal operation. Use the approved fence and gate details for materials and dimensions.
Test the gate, document the repaired posts and continuous fence line, and record measured clearances and materials.
Applicable requirement: Fence; also checks torn fabric and missing posts. An illustrative image does not establish a field measurement or compliance result.
 Signs / sign supportsNighttime reflectivity issues, damaged signs and exposed support bases.Read picture report
 The illustrative sign may show face damage, obstruction or a visible support-base concern. A daylight picture alone cannot prove retroreflectivity, sign-legibility distance, mounting height or the structural condition of the support.
Prioritize a verified missing or unreadable traffic-control message with the responsible road authority. Replace or repair the face, hardware or support using approved details, and clear an obstruction if that is the cause. Coordinate traffic control and avoid assigning a reflectivity failure from daylight imagery alone.
Photograph the sign from the driver approach and close-up, document the installed designation and complete required nighttime or measurement checks.
Applicable requirement: Signs; apparent reflectivity needs nighttime verification. An illustrative image does not establish a field measurement or compliance result.
Vegetation and sediment appear to cover part of an inlet opening. The image shows the surface obstruction only; it does not reveal pipe condition, hydraulic capacity, buried blockage or the level of flooding during a storm.
Remove vegetation and debris from the grate and throat, dispose of material appropriately and restore the visible flow path. If flow remains restricted, arrange qualified inspection of connected drainage elements. Repair damaged grate or inlet components using the agency-approved detail, and address recurring sediment sources where confirmed.
Photograph the open inlet and downstream flow path, document removed material and any follow-up pipe or structure work.
Applicable requirement: Inlets or the actual drainage-asset characteristic. An illustrative image does not establish a field measurement or compliance result.
The illustrative planting image supports a tentative count and plant-type estimate, not a botanical or health diagnosis. Some plants may be partly hidden and camera perspective can distort size and condition.
Create a location-based inventory with identification confidence. Separate routine trimming or irrigation adjustments from replacements that require approval. Have a qualified landscape reviewer confirm the cause of observed decline before specifying treatment, then set quantities and work limits for the maintenance crew.
Update the inventory after work, photograph each treated bed and record replacements, irrigation changes and follow-up dates.
Applicable requirement: Landscaping / Turf; species confidence needs review. An illustrative image does not establish a field measurement or compliance result.
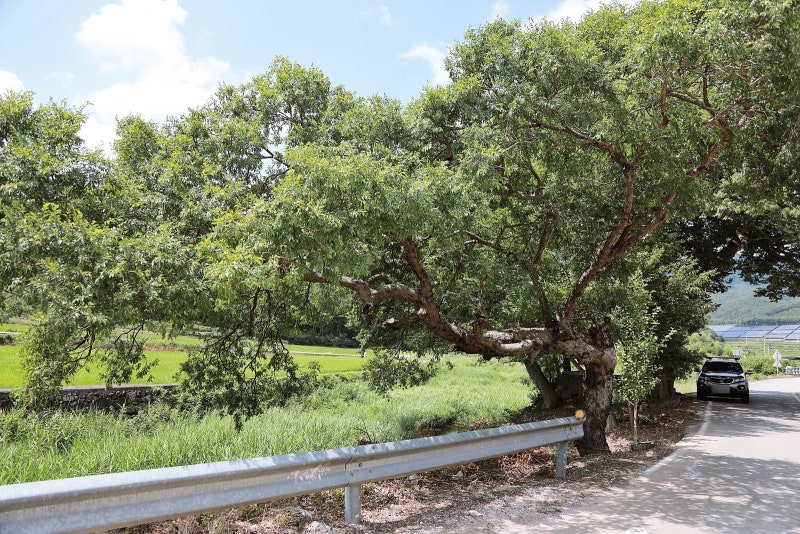 Tree trimming / vegetationTrees or limbs obscuring signs or encroaching on the roadway.Read picture report
 A tree limb appears to extend toward a sign or roadside asset in the illustration. The image cannot establish measured clearance, tree condition, right-of-way limits or safe pruning method.
Arrange qualified pruning within the verified work limits, protecting traffic and nearby utilities as required. Remove only the growth needed to restore the approved visibility or clearance while preserving tree health. Escalate instability or utility conflicts to the appropriate specialist rather than inferring them from a photo.
Photograph the cleared approach, record measured clearance and pruning limits, and schedule follow-up where regrowth is likely.
Applicable requirement: Tree Trimming. An illustrative image does not establish a field measurement or compliance result.
A single drive or photo set may contain several supported roadway assets. Their conditions and locations must be separated; one wide view cannot establish complete coverage or an official score for every asset.
Review the classification with a field assessor, remove duplicates and assign each supported condition to a distinct category report. Request closer evidence for ambiguous items. Route verified findings to the responsible crew with a location, recommended action and missing checks clearly identified.
Save category reports and source images together, record reviewer changes and track completion for each distinct finding.
Applicable requirement: Apply the relevant rule to each finding. An illustrative image does not establish a field measurement or compliance result.
The ramp example may include marking wear and other visible roadside conditions within the interchange. The location is a setting rather than a single maintenance characteristic; a ramp-wide score cannot be derived from one view.
Split the observations into pavement, marking, sign, drainage or other supported categories. Verify limits and prioritize work based on the function and measured condition of each item. Coordinate repairs where they share a closure, but keep evidence and closeout distinct.
Reinspect the affected ramp assets from comparable approach views and record each completed action separately.
Applicable requirement: Underlying asset criteria; no separate ramp score. An illustrative image does not establish a field measurement or compliance result.
 Object markers / delineatorsSuspected three consecutive missing delineators or large gaps.Read picture report
 The illustrative express-lane view suggests a gap in delineators. It cannot prove that three consecutive devices are missing without confirming the intended plan, camera coverage and the continuous run.
After verifying the design, replace missing or displaced devices with the specified type and spacing. Correct damaged mounts or misalignment and coordinate work-zone access around the express lane. Record the start and end of the affected run and the replacement count.
Photograph the full restored sequence from the approach and document spacing and material used.
Applicable requirement: Gap alert: verify layout and applicable contract rules. An illustrative image does not establish a field measurement or compliance result.
The image can show a missing cover, damaged pole or apparent fixture issue; daytime photographs cannot establish whether a luminaire operates at night. Electrical circuit condition is not visible.
Create a work order for confirmed outage or missing hardware, including fixture ID and evidence. Have an authorized electrical crew test and repair the correct component under approved safety procedures. Replace covers or hardware with compatible parts and check adjacent units if the fault appears shared.
Document the repair, tested operation and nighttime result with photos and service records.
Applicable requirement: Lighting; day checks cover poles, covers and hardware. An illustrative image does not establish a field measurement or compliance result.
This illustration represents a supporting observation that needs an assigned asset and context before it becomes a maintenance finding. A note alone does not establish a defect, its limits or the governing rule.
Keep the note linked to its original image and assessor. If field verification supports a deficiency, create a distinct finding with the appropriate asset category, action and source reference. Leave unresolved observations marked for review instead of assigning a pass or fail.
Record the review decision, who verified it and the evidence used to close or reclassify the note.
Applicable requirement: Maintenance observation unless an applicable rule exists. An illustrative image does not establish a field measurement or compliance result.
All images and findings are illustrative. They show report structure and inspection topics, not actual field evidence or a compliance decision.
Connect the condition, supporting evidence and next action without losing the context.
Document a visible pavement defect with a close-up photo and a wider route view.
Separate supported asset findings from the same drive into category reports.
Keep the visible condition, recommended action and evidence together for follow-up.
Use confirmed location and segment limits. A photo or GPS point alone does not establish that a whole route has been assessed.
Review applicable sourcesTurn photos and recorded video into a reviewable condition record. Keep visible findings, evidence, recommended actions and follow-up together.
Share observations and supporting pictures in a report your team can review.
Keep category, condition, description and action notes organized. Include location and GPS when supported by the evidence.
Classify mixed photos, review separate asset reports and track work status in the Data Hub.